Installing Octopus Deploy is a fairly trivial task. Updating Octopus Deploy is a slightly different story, but I’ll address that in another article.
TL;DR I’m diving into registering tentacles and servers as that’s the most challenging part in an Octopus Deploy installation if you’re unfamiliar with the terrain. I’ll address some possible issues that may crop up and how to avoid them. I’m not going into great detail how to install the server and tentacles as it’s pretty simple and there are documents direct from Octopus Deploy’s documentation site on how to do so.
There are essentially four aspects of installation and configuration: installing the Octopus server, the Octopus agent (or tentacle), registering both components with each other and storing your packages. I’ll address the packages in another article and skip dealing with installing both components as it’s very straightforward. In fact, the folks at Octopus Deploy already have a nice video on how to install the server here: http://docs.octopusdeploy.com/display/OD/Installing+Octopus
The tentacle instructions are readily available on the same site as well: http://docs.octopusdeploy.com/display/OD/Installing+Tentacles Rather than reiterate the obvious, I’ll just focus in on the registering of tentacles and server.
Installation note: While installing the tentacle, they’ll recommend using a listening mode (push) rather than polling mode (pull) system of communication. I’ve never tried polling, nor do I see any need to at this point. If you have no preference, go with listening.
Now to the good stuff; registering tentacles with Octopus. When beginning your first Octopus Deploy installation, there are three things to keep in mind:
- Make sure you have a clear network path to the server from the tentacle
- Make sure the firewall ports to be used on your server and tentacle are open
- Keep the thumbprints handy when registering the tentacles and server to each other
The network path and firewall ports will simply make registering easier. Keep in mind firewall ports on the Octopus server do not have to match the tentacles and vice versa, they just need to have an open path to one another. After the tentacle installation, there’s a setup wizard. In that setup you’ll notice that a port was required as part of the installation.

Make sure the port number is opened on your Windows Server firewall only on the tentacle itself and that the server itself can access the Octopus server. If not, you may receive an error message when you try to register the tentacle.
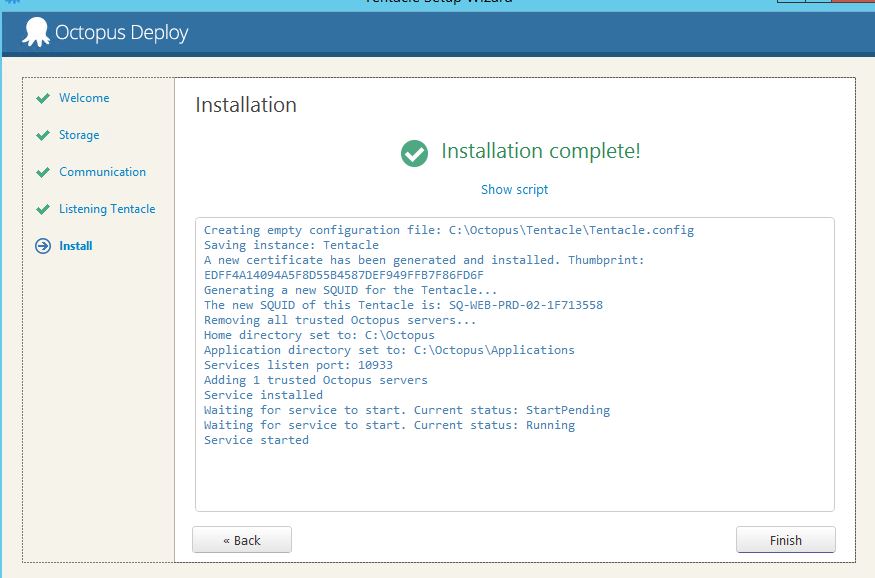
Once you’ve copied the thumbprint (from the Octopus server) to the listening tentacle, you should see another install button. Hit that button and your screen should appear similar to this:
Side story:
The recent project I had at a large client had numerous network configurations world-wide; multiple zones and intricate port restrictions between said zones. One of the biggest features in Octopus isn’t given enough credit: the ability to have tentacles on different ports than the server itself. At first, I didn’t understand how this worked. I had gone so far as to ask on the support forums just how ports worked in Octopus.
For large companies with numerous network restrictions, this is a huge feature. For smaller organizations with less to manage, I imagine it’s not such a big deal. So what’s this mean for you?
Take this scenario for example:

Keep in mind this example drastically understates all the complexities between networks. It’s meant to show that the Octopus server does not need one specific single port for tentacles to register to!
You should know in advance how your servers are currently communicating with one another within your organization beforehand so you can determine if there is even a path that the Octopus server can communicate with the tentacles. If not, then your network team may have to reconfigure some security measures or create a new network configuration where all the tentacles have a way to communicate with the Octopus server. The Octopus documentation site mentions how communication between Octopus and the tentacles actually works (link).
Regardless of whether Tentacle is in listening mode or polling mode, all communication between the Tentacle and Octopus is performed over HTTPS. Octopus and Tentacle both have a public/private key pair, that they use to establish the HTTPS connection (one is the TLS server and presents a server certificate, the other is a TLS client and presents a client certificate).
Back to the registration. Once the tentacle is installed, you can attempt to discover the machine from your Octopus server interface.

You can then assign the new tentacle to an environment and a role. Roles are essentially dynamic labels you can assign to servers. Whatever role you desire, you simply type it in and it will be an available role for all tentacles. It’s more of a meta filter for when you want to deploy to specific types of tentacles.
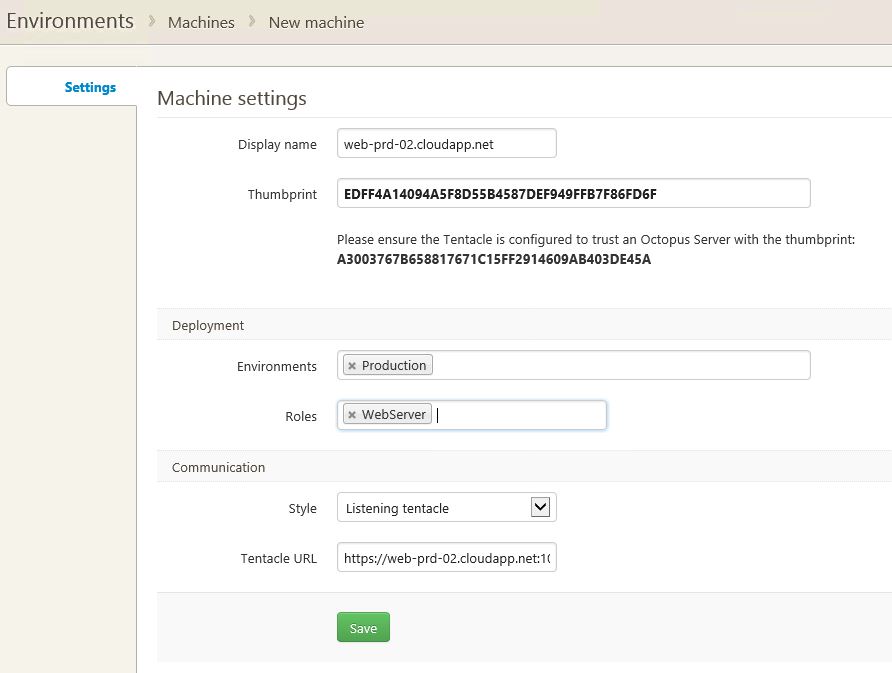
Once you hit “Save”, you should see the environment screen with the newest tentacle added to your environment.

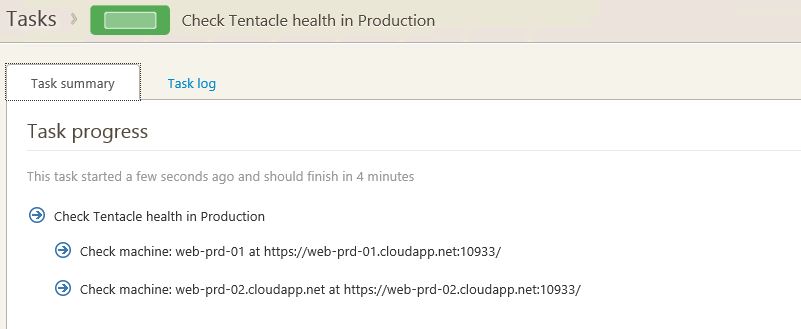
Keep in mind that this alone does not mean the tentacle has successfully registered. The next step is to check the health of the environment. 
You’ll be taken to the Task summary for the Check Tentacle health in your environment.
 Click on the Task log tab to view the details of the health check.

Green is good. Your tentacle is now good to go.
You may have noticed that during your installation of the Octopus server, there’s no mention of SQL Server or IIS. That’s because Octopus uses RavenDB as the embedded database of choice and NancyFX as the embedded web server. At first glance this may seem to be a shortcoming as some organizations may want to harvest any information in the SQL Server database or customize the web server in IIS, but I’ve learned to view both design choices as bonuses. I will discuss the database and web server technologies in further detail in the next articles in this series.
So we’ve focused in on the registration of tentacles and some of the pitfalls to avoid. In the next article, I’ll cover the one of the two components of Octopus; first the database (RavenDB) followed by the web server (NancyFX) and why they’re an important and positive feature to have rather than the traditional SQL Server and IIS that Windows applications are accustomed to using.
Comments
3 responses to “Configuring Octopus Deploy and Tentacles”
This is a great series Ian, I look forward to seeing the rest of the articles!
Another interesting thing about the ports is they can even be different on both sides if you need to use port forwarding – e.g., Octopus sends commands to port 10933, but the router/firewall port forwards that to the Tentacle listening on port 10934.
I’m glad to hear that you see Nancy+Raven as a positive. Early betas of Octopus used SQL Server, and while it may be a more easily accepted technology, it tends to need to be owned by DBA’s (some organisations have policies that prevent using SQL Express, for example) and comes with various licensing and other considerations. RavenDB tends to be invisible on the other hand, and for what it’s worth, RavenDB is really just a wrapper around ESENT which is the same technology that powers Microsoft Exchange and Active Directory. I’m not sure many organisations would have a problem with that given they probably use one of those technologies 🙂
Likewise, we used IIS until Octopus 2.0. IIS is great, but people tend to customise it a lot, so it’s difficult to develop software that runs reliably on every IIS server out there (e.g., once a customer couldn’t manage to get Octopus working; eventually we found out that it’s because they deleted the default MIME types in IIS for another application, which meant Octopus couldn’t work anymore). So we do what SQL Server Reporting Services does, and we run on top of HTTP.sys, the Windows kernel driver that also powers IIS. So, in some ways we’re still using the HTTP/HTTPS server that IIS uses, but without all the extra stuff on top.
D’oh, I think I got carried away there, sorry for skipping ahead! Love the series!
Paul
Thanks so much for the comments, Paul! Please get carried away! 🙂
I really think that the port configuration is a really big feature that doesn’t get enough credit. For larger enterprises, a product that’s able to adapt to the environment is a big feature. Keep in mind I was testing out InCycle/MS Release Management 2013 which required one port available for all agents, servers, the web client and the desktop client! This was a huge hurdle just for our pilot testing. The thought of deploying it company-wide would give me nightmares.
As for SQL Server, the current organization I’m implementing Octopus at uses it almost exclusively. Now, there are some parts of the company that use other databases but by and large it is the standard. Some managers like the ability to view raw data from some of their vendors’ products within SQL Server. I think from a troubleshooting or debugging perspective, it’s useful to have access which is probably the underlying motive, however the Raven Studio within Octopus should suffice to meet the troubleshooting requirement. I would say though that running on SQL Server was more or less a matter of options, not requirements. Again, for larger companies with available resources, it may be something they want, but not realize they don’t need it.
During my testing of Release Management, we were easily able to view into the SQL database in which it was installed on, view all the tables, data, sprocs, views, etc. Was it a major bonus that we could peek behind the scenes? Meh, not really, but it was nice to see everything if they needed to troubleshoot or do some sort of reporting or analysis. But in reality, that ability doesn’t add value to the product’s primary goal: automating deployments.
I personally view RavenDB as a better option for a number of reasons, but as your blog post mentioned, installation is a _lot_ better without resorting to SQL Server. Likewise with NancyFX. Honestly, I wouldn’t gain much if at all if Octopus was on IIS as well. The added value of SQL Server and IIS compared to Raven and NancyFX is practically zero to me as an end user. Octopus runs fine without them, so what’s the benefit of using them?
Obviously, I really like a lot of your design choices. Initially, some of them didn’t seem so clear to me and forced me to rethink my perspective about Octopus, our deployments and how your design choices met our needs. In the end, Octopus has flourished so far and I really haven’t seen any negative outcomes from omitting the usual SQL Server and IIS requirements. If anything, it’s made Octopus better.
So, rather than just keep gushing over Octopus, I’m just going to keep on writing my articles and hope you’ll get a chance to read them. Thanks so much for your comments!
Talk about getting carried away.. gah. Sorry!
Ian
[…] server, you have to specify at least one role for that tentacle. I’ve covered tentacles previously in the Octopus Deploy series. When typing in the role field, you’ll see that you can type anything that you want in […]