One reader asked in my Octo.exe deep dive if I had published how to setup continuous deployments. I had mentioned it in the deep dive and while I’d rather do a comprehensive piece to see how many different ways we could set up a continuous deployment, a simple post on how to setup continuous deployments in TFS is just as effective for the mean time. Let’s jump right in.
Whether you’re using your own TFS 2013 server or Visual Studio online (VSO), you can use the octo.exe to continuously deploy and fire off a release after your build is finished. In principle, it’s very easy to kick off a release in Octopus Deploy.
1. Create a PowerShell script and have it call the Octo.exe. Make sure to use the create-release command as it can fire off a release using the latest NuGet packages – which is of course what you want.
2. Within your CI tool of choice, execute said script after the build, test and NuGet push have executed.
Sounds pretty simple, right? It is. One of the great aspects of the octo.exe is that it doesn’t matter where the octo.exe is being called, primarily because the server and apikey parameters allows you to specify the server to create the release on any machine. This allows for a great deal of flexibility. The location of the octo.exe is mostly irrelevant however in the case of continuous deployments, the primary concern is not where the octo.exe is but a matter of when it fires.
Edit: Note that this solution is for Octopus users that are not using the built-in NuGet feed within the Octopus Deploy server. We use the NuGet.Server that’s distributed on NuGet.org within IIS on separate servers as we deal with tens of thousands of packages. If you use Octopus Deploy’s internal feed, it’s easy to enable continuous deployments (CD) per their instructions – just know that it’s referred to CD as “Automatic Release Creation“, not continuous deployments.
For TFS (and Visual Studio Online (VSO)) simplest way we do this is:
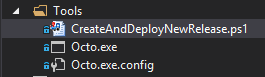
1. Create a root level folder in your solution. For my example, I’ve named it “Tools” but call it what you want.
2. Inside my “Tools” folder, add the Octo.exe (download it from the Octopus Deploy site). I’ve also copied the Octo.exe.config file into my
3. Create a PowerShell script – call it whatever you want. To be overly-obvious, I’ve named mine: CreateAndDeployNewRelease.ps1.
4. Our PowerShell script looks something like this:
$scriptpath = split-path -parent $PSCommandPath
$octopath = resolve-path "#scriptpath/Octo.exe"

# parameters should all be on the same line
& $octopath create-release --server=https://myoctopusserver
--releasenotes="Deploy triggered from CI Build for Dev environment"
--project="MyProject"
--deployTo="MyDevEnvironment"
--apiKey=API-123456...
This code is very simple. We’re simply getting the full path of the octo.exe executable that’s within the your solution and creating a new release with the create-release option. Note, if you use create-release and don’t specify a version number, the deployment will use the latest version of the NuGet packages. Keep this in mind. This is why versioning is important – especially in Octopus Deploy.
5. Add the PowerShell script into your Tools folder within your solution. Your folder in Visual Studio should look something like this:
6. Check these changes into your TFS solution. This is very important as the file and executable need to be on the build filesystem after the build is completed.
7. Next, within your build template, under section 2. Build, sub-section 5. Advanced, look for the Post-build script path field. Note: this field may not exist within your template.
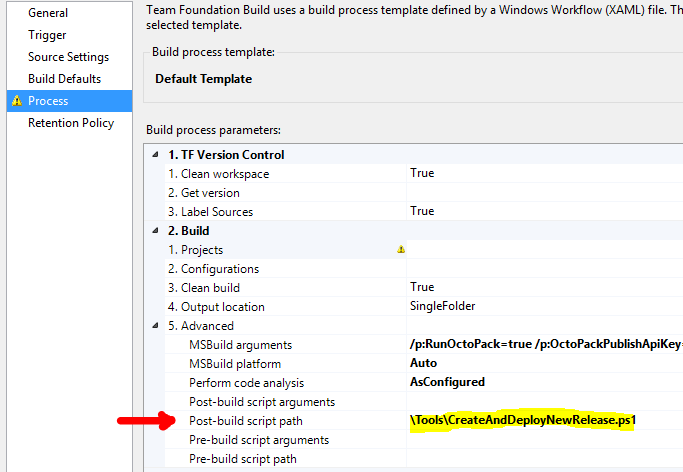
The template I’m using in this example is the TfvcTemplate.12.xaml which (I believe) is the default template for TFS 2013 servers.

You may have more templates at your disposal. As long as there is a step similar to “Post-build script path”, that should be fine.
8. Once you’ve saved your build template – any time you queue a build using said template, Octopus will be called to do a deployment. The best evidence is to typically leave a release note for the –releasenotes parameter. You’ll see your releases with that text like such:

Inside of the Release itself, you’ll see the release notes too.

Setting up continuous deployments isn’t difficult, but there are a some hurdles to overcome. There are also some possible improvements to make with this method however, it’s effective enough for a start. The first improvement that comes to mind is to have the octo.exe setup on each build server itself. Ideally, we could cut out the octo.exe being checked into each solution and come up with a standard location for PowerShell scripts to look on all build servers and execute the octo.exe. Why include it in the source if it’s going to be on a build server? Well, we have a lot of build servers and frankly, not everyone does continuous deployments. The octo.exe is small and this method works just fine for either TFS on-premise or VSO.
As far as continuous deployments are concerned, I’ve slowly had a change of heart. While continuous deployments make perfect sense, they leave a plethora of NuGet packages in your feed. Without some automated NuGet package management, NuGet packages become a problem in and of themselves to manage. If you have an automated process to keep a feed relatively clean – I’m in favor of continuous deployments. Theoretically, having hundreds or thousands of NuGet packages should not be a problem, but in our experience that depends on the NuGet server you use. Just be aware of this side effect; continuous deployments can make NuGet package management an issue for you to deal with.
I hope this helps answer the question on how to setup continuous deployments with TFS 2013/VSO and Octopus Deploy. I imagine this same process will work with TFS 2015 assuming that the default build template includes the post-build script path parameter. I’m sure there are other techniques that can provide this same level of functionality, but this approach works for us very well and translates across to Visual Studio Online. We don’t use VSO, however I have tested it using this exact method.
Comments
8 responses to “Setting up continuous deployments with Octopus Deploy and TFS”
I’m curious that your technique differs from that in the octopus documentation. We have and we use the OctoPack package on the deployable projects. You do this too and specify your API key twice, once in the build arguments for OctoPack then again in your script for pushing via octo. If octopack can do the pushing to a new release too, then why don’t you use just that?
Hi Daniel,
The OctoPack doesn’t trigger the new release – all it does is upload the NuGet package to the NuGet feed after the TFS build is done. You’re getting confused with the API Keys. The first one is for the OctoPack to upload to the NuGet feed and the second API key is for the Octopus Server.
The API Key that’s used by the octo.exe contacts the Octopus Server (not the NuGet feed) needs to have the appropriate permissions to trigger the release for the deployment to occur but it’s not the same as the NuGet feed API Key. The octo.exe needs to be triggered after the new build is uploaded to the NuGet feed. I hope this explanation helps.
Interesting Ian,
Thanks for the post; We do automated deployments using TFS and Octopus. The Release in Octopus is created as soon TFS build pushes the package and in our lifecycle definition we have flagged our DEV region for automated deployments, which automatically deploys the application once the new release is available. That is just with outbox features without any custom scripting.
I assume you’re using the Octopus server’s built-in NuGet feed – that makes automated deployments much easier as you can tell Octopus in the portal UI to just automatically deploy to a given environment upon a new package being uploaded. But if you’re not using the the server’s built-in feed, you need to use the script I mentioned above or some other similar mechanism to trigger Octopus to deploy after you’ve successfully built a NuGet package.
[…] http://ianpaullin.com/2015/08/13/setting-up-continuous-deployments-with-octopus-deploy-and-tfs/ […]
We have a need to target several physical machines for a deploy and need to coordinate what is essentially a 3 phase process across all the boxes:
1) Bring all machines down to maintenance mode (stop services etc)
2) Deploy new code to all machines
a) This *may* also require serial sequencing, box A then box B
b) In other cases they are all parallel
3) Bring all machines back up to running mode (restart services etc)
Is there anything built into the octo process to help cater to this senario? Any suggestion on how to crack this nut?
I’m not sure if I understand the question. The octo.exe doesn’t really do the work – it just triggers a project’s deployment process. The “–deployTo=” option will actually deploy the newly created release to whatever supplied environment you’ve passed along. All your steps can be done within the deployment process, but you’ll have to be more definitive about your points A and B in step #2 – when serial vs.parallel work should be done.
Ignore my 2.a and 2.B, they really are not needed to illustrate the point. Just go with the 1,2,3 bullets.
This really just a question about coordinating a deployment across several physical system which act logically as a single solution. Think DB server, Web Server, and App Server. I need for example to bring the App Server down to maintenance mode (stop all the win32 services) before upgrading the DB Server. Or as another example on bringing the system back up for use after the deploy I might need to restart all the services on the App Server before allowing the Web Server back online.
I have the process needed for each of the system types scripted/automated and can (and do) today run each in an automated way….but I have to do each in turn manually. Essentially my process today is:
1) Shut down IIS on the web server
2) Shut down Win32 services on the App server
3) kick off the deploy scripts on each box
a) start DB server deploy scripts on that system
b) start the App Server deploy scripts on that system
c) start the Web Server deploy scripts on that system
d) monitor fopr completion of all 3 of these
4) restart the Win32 services on the App Server (or at least make sure they automatically come back up clean)
5) restart IIS on the Web Server.
Because these scripts/processes span several machines I’m looking for some means to coordinate the processes.
In another slice of life I use Jenkins for builds/automation/etc and I know I can build some multi node coordination with jobs using various linkages and downstream plugins etc. I’m wanting to know if any of the infrastructure in octopus can help with this coordination.
That help?